Sunday, July 31, 2022

Attempting ADC

 I've attended a couple of sessions within the last year led by renown planetary imagers (Damien Peach, Agapios Elia) in pursuit of what I can do to refine my setup. One thing that both mentioned rather high up on their list was using an Atmospheric Dispersion Corrector (ADC) in the imaging train. The premise is that the atmosphere bends blue light differently than red light, causing a slight smearing of the "white" light we get at the eyepiece. An ADC, which is a set of adjustable prisms, allows you to correct the dispersion, yielding a sharper image. 

I had hesitated on acquiring one, in part because both individuals use large SCT units for their imaging - would a Newtonian benefit? Second, I had assumed (incorrectly) that the amount of smearing would be minimal once the planet got above 30° (see this). And finally, the Autostakkert software supposedly performs a correction for this when stacking.

Autostakkert "RGB Align"

I ended up convinced that it might be helpful so I got the ZWO model which was a past Sky & Telescope "hot product" award winner. The unit arrived about a week after ordering it, and as forewarned by my research, there were no instructions on how to use it. Fortunately other brave souls have sorted it all out and been kind enough to post video tutorials.


The unit is placed between your Barlow and the imaging camera. There are two steps for having it correct the atmospheric distortion:
  1. Use the bubble level to ensure that the unit is parallel with the horizon. That will obviously fall out of order as the evening progresses and your scope tracks the planet across the sky, so re-doing this step every half hour or so may be needed.
  2. Adjust the two silver levers (on right in picture) in equal but opposite directions until you can no longer detect color fringing 
It is that last step that can be tricky. One approach recommended by Martin Lewis is to overexpose the planet on your screen to make the fringing more obvious. You can then iteratively adjust the levers until the fringing is minimal (or at least you are unable to say which side is reddish one and the other bluish). Many of the imaging capture programs (e.g., FireCapture, ASI Capture) also have a utility to help assess your alignment. In general, when the circles overlap then you have achieved merging the spectrum back into white light. But given how wildly the two circles will bounce around on the screen it is still a bit of a swag. 

Performing ADC Alignment with Jupiter

This past week I decided to give it a go and placed the unit between Barlow and camera. Given the height of my set up, I had to use the step ladder to reach up to perform the leveling and then to gradually spread the levers, constantly referencing the laptop screen to see the impact. Of course another trick is to do it gently enough to not knock the planet out of the field of view. After about 5 minutes I felt the bouncing circles were are concentric as I might achieve. I did a focus and then started a couple of captures.

Sadly, what I noticed about 20 minutes in was that my focus was a bit soft. Looking at the focuser read out I noticed I was racked fully in due to the extra back space the ADC introduced. And sure enough, the actual focus point was just a tad further in. No amount of ADC will substitute for mushy focus, so I pulled it off and resumed imaging with a sharp focus. My task now will be to remove one of the spacers from the Moonlight focuser so that we can get to that focus point with the ADC in place.

Will it all be worth it? Hard to say, but given the feedback from well respected imagers I certainly am committed to finding out. And empirically it makes sense to try to correct this dispersion as the image is captured rather than to depend in post-processing algorithms to fully compensate for the effect. That's the game now - incremental improvement wherever I can achieve it.

Jupiter without ADC - can I tease out more with an ADC?


Sunday, June 19, 2022

Fine Focus

For any astro-imager, focus is always a primary concern. When doing deep sky it has to be spot on to get those tack sharp stars that we love to see. Fortunately for DSO imagers, there are aids such as a Bathinov mask that can help ensure you are on the mark.

Bahtinov Mask

 In planetary imaging it is a little more challenging. We also need to be in perfect focus to capture the subtle details, but a Bathinov mask isn't going to work on a non-point light source. Trying to move the scope to a bright star to focus first before centering the planet also seems to fall short. What one is left with is manually fiddling with the focus knob while watching a feature of the planet to get it as sharp as possible. For example, a Jovian moon or the Cassini division are often good targets to pay attention to in this effort.

Unfortunately the planetary imager is confronted with another problem: the high magnification utilized to get the planet's disk to a suitable size. This means that the slightest touch causes the planet to wildly dance in (and sometime exit from) the field. The result is an iterative set of focus-recenter-evaluate attempts until you feel it is as good as you can get (or your patience is gone and you settle for "close enough"). When rebuilding the OTA for my 10" Cyrus1 Newtonian I even invested in a nice JMI focuser with a feather touch micro-focuser, but it still didn't solve the fallout of a human hand touching the scope.

I finally came to accept that investing in a motorized focuser was going to be necessary to solve the problem. Based on the positive experience Dale Ghent had with MoonLite focusers for HALO, I opted to order from them. It takes a bit of time to go through all the various options but I eventually balanced my desire for bells & whistles with my budget to get a Crayford 2" focuser with their universal adapter and stepper motor for about $700. To my surprise and delight they had the unit to me within about a week.

Next came replacing the existing JMI with this snazzy unit. If you look at their universal adapter, it is "a plate with multiple many different 4 bolt hole patterns for Newts over the years, Meade, GSO, Orion, Celestron, etc." 


However, none of them aligned with the existing holes I had placed into the tube when installing the JMI focuser. So it became a tedious process of securing the plate with a couple of openings that did align and then trying to accurately measure where the new hole had to be drilled to accommodate where the opening was on the plate. After a couple of hours the plate was finally secured and motorized focuser attached. 


Installed MoonLite Focuser

As you can see from the picture above, this is a substantial unit. It occurred to me that this would probably alter the scope's balance once I added in the Barlow, camera, and possibly an Atmospheric Dispersion Corrector (ADC). In the past the scope had always been a little "rear heavy" when imaging, requiring placement of a magnetic weight along a shelf bracket that runs along the front half of the tube. I opted to install a similar bracket along the back half of the scope, and indeed it was needed to achieve balance when I did a dry run.


A couple weeks later with Jupiter and Saturn getting a reasonable (if not great) altitude in the pre-dawn skies, I gave the MoonLite unit a test run. I did not purchase a separate hand controller to operate the focuser but instead attached it to the laptop using the provided USB cable. The unit also has to be powered - so yet another cord dangling from the focuser that I tried to tuck alongside the scope to avoid any tension or vibration it might cause.


The interface is pretty intuitive, allowing you to move in or out by orders of magnitude. Once Saturn was centered it was easy to display the planet in the video capture software and have the MoonLite Single Focuser app on top so that I could watch the planet as I commanded the focuser to adjust its position. During the process there was minimal movement of the planet and no risk of knocking it out of the field. I ended up getting what I felt was as good a focus as I could achieve and was happy with the result after I processed the video captures the next day (below). 

While the swapping out of the original JMI for the MoonLite ended up being a little challenging in the installation stage, I'm very happy (and blessed) that I could do it because the results are what I was looking for - a far less painful and far more accurate focusing experience. Like so many other hobbies, amateur astronomy (especially when coupled with photography) is an investment. It seems to be a continuous process of identifying what might improve our ability to see or photograph the heavens and then budgeting to make that next upgrade.


1 I call it the "Cyrus" telescope because the optics were made by Charles Cyrus, a friend and excellent ATM from back in my days with the Baltimore Astronomical Society. After Charlie's passing his instrument made its way to me and I have enjoyed it for a couple of decades now, most recently redoing the OTA that houses the mirror.

Monday, May 30, 2022

The Dogs' Globular

Tucked under the Big Bear's tail is the tiny constellation of Canes Venatici, Boötes' hunting dogs. For such a small constellation it might be accused of celestial gerrymandering by having its borders claim such deep sky masterpieces as M51 (Whirlpool galaxy) from Ursa Major and M3 from the herdsman. 

Messier 3 is a wonderful globular boasting half a million suns packed into its perimeter. Even from Towson you can sweep up this dandy DSO as a fuzzy 6th magnitude star roughly midway between Arcturus and Cor Caroli (the α star of Canes Venatici). My 6" RV-6 Newtonian at medium magnification and averted vision shows a brighter core and some of the members of the cluster winking in and out with averted vision. The 10" Cyrus reflector exposes many more suns and begins to hint at the true majesty of this object. 


When planets aren't around for imaging I will give the deep sky a go. In this regard I'm not very hard core, using my  unmodified Canon EOS t6i rather than a dedicated unit, and I have not invested in things such as a field flattener that the more serious imager might do. I also do not currently have a guide camera, relying on a good polar alignment and shorter ~30 second shots to keep stars from trailing. I use a simple illuminated tracing pad to serve as light source for my flats. I have invested in a copy of PixInsight for processing, and will probably be plumbing the depths of its functionality for years to come. So when at the end of April we had a pleasant evening, a little chilly but with pretty good transparency, I rolled the mount out of the garage, attached the Vixen, and set off to see if I could get a nice scrapbook photo of the globular.

One of the things that I wanted to try out was my recently purchased Baader Moon & Skyglow filter to see if it could cut down on the nasty light pollution in my stacked image that I so often encounter when doing deep sky. The company claims "it darkens the spectral region which is particularly marked by street lamp light, which is the biggest contributor to the nightly Skyglow". The second thing I was interested to evaluate was BackyardEOS, a software package that allows you to automate a sequence of exposures taken with the camera. In the past I had turned on the camera's built in Wi-Fi and used the Canon app on my tablet to take the exposures. But that gets tedious fairly quickly, firing off an exposure every 20-30 seconds. 

The time spent on polar alignment was worth it as the scope dutiful slewed over to Arcturus for a quick focus check with the Bahtinov mask in place. From there we slid up to M3 and began the session shortly after the passing of astronomical twilight. The BackyardEOS performed quite well as I set up a series of 30 second exposures over 15 minutes. At the end of each run I would check that the globular was positioned near center and that no star trailing was evident. After 6 such runs I then set about acquiring the dark and flat exposures.

Of course, collecting the data is only half the game. The stack in Deep Sky Stacker looked pretty good when I did an auto-stretch in PixInsight. The light pollution detritus was much reduced, so high marks for the Baader filter doing its job fending off the neighbors' lights. This time, in my search for a good PixInsight workflow, I followed along with a YouTube video made by Richard Bloch. It was one of the best I've watched so far, easy to follow along and enough rationale provided for why you are taking certain steps. It ended up helping me produce a pretty nice image of this cluster of suns that was the first faux comet entry that Messier himself is thought to have observed. 

It is always satisfying to see your work improve, and I was happy to find that my small investment in the two new tools did help me in my desire to occasionally snatch a deep sky portrait from the driveway of my home.


Thursday, April 14, 2022

Saturn Shadow Play

Saturn is gradually climbing out of the Sun's glare in the pre-dawn sky, and by month's end it clears 20° in altitude before civil twilight starts. The ringed planet is both spectacular and subdued in the eyepiece. The rings, even if beginning to close up compared to the last few years, are just an amazing sight. The globe, however, is subtle with its pastel colors and gradually darkening bands as you move north to the darker NPR. For this reason most of us will admire the planet for a minute or two before moving on to another target of interest.

A unique aspect to Saturn is the shadow play of globe and rings. The most obvious is the shadow of the globe cast on the rings as they arc behind the planet. Prior to opposition it is seen on the preceding (western) limb, reaching maximum visibility at western quadrature (which will be May 16th this year). It gradually wanes until it is invisible at opposition and then emerges on the eastern limb, growing until reaching eastern quadrature. 

Saturn, a month after opposition, shadow on eastern limb

A little harder to detect at times (and more complicated to predict) is the shadow of the rings falling upon the globe. The geometry is multifactorial in predicting where (or if) we get to see the rings' shadow; the extent to which the rings are tilted and the angle between Earth and the ringed planet can influence it. In general, the shadow of the rings on the planet is obscured when they are "fully open" and then gradually becomes more visible (and thinner) as we head towards Saturnian equinox. 

We're entering the period where the rings' shadow is beginning to peek out along the southern border of the rings. Earlier this month there was an interesting observation submitted to ALPO by Clyde Foster, an accomplished planetary imager from South Africa. In it he noted a bright white speck at the intersection of  the western limb and southern edge of the rings (below). At first he considered it as an artifact, but then Martin Lewis from England postulated that this actually represented us seeing sunlight passing through the Cassini Division onto the planet.


Mr. Lewis' analysis was greatly aided by the tool known as WinJUPOS, a software program that handles the calculations of Solar System object geometry (among other marvelous functions). The graphical representation of Saturn for early April when Clyde made his observation showed that the ring gap was ever so slightly peeking out from under the rings on the western limb. 

Using WinJUPOS to examine the position of the shadow reveals that the "Cassini Gap Sunshine" will continue to emerge from under the rings on the western limb for several more weeks, reaching its maximum exposure as Saturn reaches western quadrature May 16th. It then begins to retreat until it is tucked up under the rings and lost from view by mid-June. The animated GIF below shows the ebb and flow of the CGS. 


Animation showing the Cassini Gap Sunshine (CGS) visibility

I suspect that this might be imaged with a telescope as small as 6" in aperture, and possibly even seen visually. Steady seeing will be a huge determinant in your success, but the good news is that at dawn we often find some of the steadiest conditions and Saturn will be near its culmination in the sky. Also be sure to allow enough time for the optics to cool to the ambient temperature, especially with a Newtonian system. I for one am hoping to see this CGS in mid-May with my 10" reflector and will share any success on the HAL Google Group. 

And, in full disclosure, seeing the CGS should be easier next spring as the rings close up even further. Sure, it's going to require a little effort to see if you can observe or capture this first opportunity at seeing the sunlight filtering through the Cassini Division on the cream-colored cloud tops below. It is guaranteed to test your planetary observing (or imaging) skills to snag it like Clyde. But then again, isn't testing your skills at the eyepiece a part of what makes this hobby an enduring passion for so many of us?

Thursday, March 17, 2022

A Filtered Experience

The topic for the HAL meeting this evening was "filters", which is a pretty big topic! After all, we have filters for visual use vs. imaging use, and then filters for specific targets from faint DSO to our brilliant Sun. Hopefully I provided a little insight at the session based on my personal experiences, especially as to planetary observing.

Back in '65 when I got my first scope, a classic 60mm refractor with .965" high-powered eyepiece, I knew one thing for sure that I really wanted to see was Jupiter's Great Red Spot. The scope showed the planet as a fuzzy disk with slight rainbow fringe, perhaps a stripe or two upon it, but no GRS in sight on the multiple occasions I target the giant planet. Somewhere - probably a library book that I had borrowed - I read how a blue filter would darken the GRS and therefore make it stand out better. Clearly that would make my target materialize in the eyepiece!

My dad was a local pharmacist and contracted with a camera shop down on Falls Road to provide film developing service for his customers. He was supportive of my hobby (so long as I didn't get the foolish idea that I could make a living looking at stars) and helped me to get a 2x2"Wratten 80A blue gelatin sheet and a mounting ring for the filter that was just a little smaller than the internal diameter of the refractor's dew shield. I carefully cut out my circle of blue, mounted it in the holder, dropped it into the front end of the scope and then waited for the next clear night. 

The view of Jupiter was quite pretty with its blue hue, but even after several attempts on different nights I still could see no GRS. (Of course, I am assuming that just by the odds I would have seen it on one of those evenings. I had not discovered Sky & Telescope with its listing of GRS transits yet, and online lookup would have been the glorious stuff of science fiction in the mid-60s). While filters lost a little of their charm from the experience, I felt that the principle was certainly sound. Reddish features would have their light blocked by a complementary blue filter, making them darker and easier to see. I began to suspect (correctly) that it was more an issue of small aperture than filter failure.


When I graduated to my 6" Newtonian I was finally able to catch sight of the Great Red Spot one evening without a filter. It had fairly good intensity back in the late 60's - similar to its appearance now. The availability of a glass filter that would screw into the bottom of the eyepiece was (as far as I knew) nonexistent. So no filters for visual inspection of my planetary quarry at that point in time.

But by now I was starting to play with using a second-hand Minolta range-finder camera to take pictures using the afocal method. Talk about a tedious hit or miss approach! You had to line up the camera over the eyepiece at where you think you are at focus, then hopefully get the planet in the field just based on the 6x30 finder scope, and finally snap the picture with a cable release while hopefully not jiggling the scope. Despite all that, I had occasional success with the technique. It also drove me to learn how to do my own B&W development rather than watch the photo lab assume nothing was on the roll of film and slice right through my field when trimming the negatives.

By this point I'm a HS freshman, networking with fellow amateurs at the Baltimore Astronomical Society and with enough pocket money from working at the pharmacy to buy some hobby stuff. I got another filter holder that would attach to the front of the Minolta and outfitted it with a Wratten blue gelatin. And then on a May evening in 1970 I did it - I actually captured the GRS photographically, a dark spot near the planet's central meridian. It was an OMG!! moment as I inspected that roll of film while hanging it up to dry. 

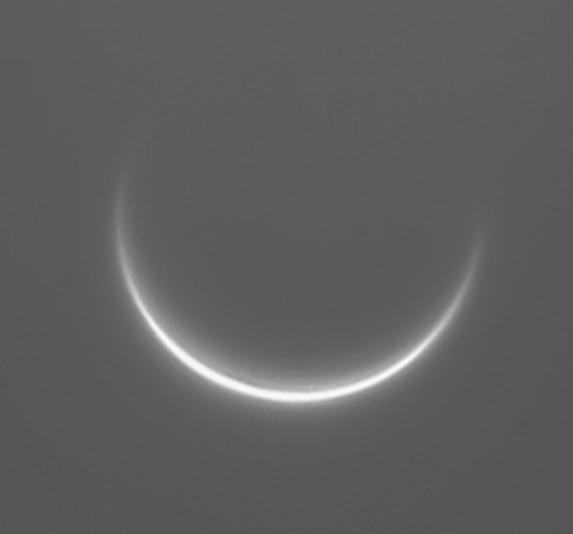
Jupiter - afocal method with 6" f/8 RV-6 at 140x
using Minolta camera with 80A filter

It was probably shortly after this that I began to find retailers of glass Wratten filters that we are so familiar with today. I started my collection with a #80A blue and it gradually expanded like a rainbow. Over the years I have found that, for visual planetary observing, they are not going the wow you like an O-III filter can do on an emission nebula. But they can be helpful if you approach their potential realistically, i.e., a tool that can improve the contrast of notoriously low-contrast planetary features. In addition, they do not cost an arm and a leg (at least not for the basic Wratten glass filters that almost any good astronomical supply house will carry).

Although I am given over more to imaging a planet rather than sketching it these days, I still do enjoy at the end of the session taking a few minutes to gaze upon my target before putting away the equipment. In doing so I'll almost always apply a filter in an effort to see the most that I can. Here are my common go-to filters using my 10" reflector (if you have a smaller scope then a corresponding filter with higher transmission rate may be a better fit):

The brilliance of our sister planet Venus means you have to knock down the glare significantly to be able to appreciate the disk. I often use a #47 Violet with only 13% transmission to accomplish that. The most I have been able to make out on Venus is some brightening at one or both polar regions ("cusp caps").

When Mars comes calling every other year it is a fun target and arguably one of the best for filter enhancement. The #80A medium blue is helpful in seeing the polar ice caps and lighter orthographic clouds that sometimes form. A light red #23A helps to darken the albedo features and boost their contrast. I have also found a deep yellow #15 to be a nice choice to reduce the planet's brightness and boost overall contrast.

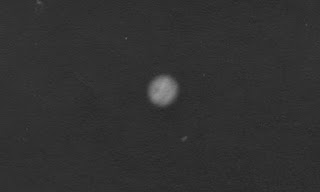
Mars through my 6" f/8 RV-6 & Red #23A filter 10/7/2020


Jupiter is an absolute favorite for me given how dynamic it is. I have always found a yellow filter (#15 deep yellow or #11 yellow) as a good, all purpose aid to improving the contrast of the belts against the lighter zones. A pale blue (#82A) or medium blue (#80A) are helpful as well, especially with the Great Red Spot (the pale blue improves the contrast yet you can still pick out some of the red overtones to it).

While not as subtle as features among Venusian cloud tops, Saturn offers delicate features with its gradually darkening belts as you move from bright equatorial zone to dark polar hexagon. Again, a yellow filter seems to work well for improving the contrast a bit on the globe. 

Based on a very interesting "consumer reports" article on Cloudy Nights where author William A. Paolini compared multiple filters to find the ones that seemed to be the best for accentuating planetary detail, I have recently purchased a Baader Contrast-Booster filter. Now I just need to wait for this fall when we'll have Mars, Jupiter, and Saturn available for my own assessment of how well it does. 

If planetary observation is something you enjoy then you really should play around with some filters to see if they help you pick out some of the subtler details. Most retailers offer the Wratten color filters for under $20, and so long as you are not expecting miracles to happen, you'll likely find them an interesting and enjoyable accessory to have in your observing armamentarium. 

Saturday, February 26, 2022

A Tangent on Venus

In last month's blog I chronicled my effort to see Venus as it skirted north of the Sun during its inferior conjunction. It was not a particularly easy task but certainly doable in clear skies. This month I'm doing a little armchair astronomy because that experience made me ponder when circumstances would be at their best to capture Venus as it moves between our home planet and the Sun.

Trigger warning - math is used in this blog post!

While you could spend time scouring the Internet to find the maximum distance that Venus can lie from the Sun during an inferior conjunction, where's the fun in that for anyone with geek tendencies? If we dust off our trigonometry and get some basic orbital elements we should be able to swag an answer to our question. 

It always helps to define some terms before solving the problem. The ecliptic is the plane in which the Earth orbits the Sun. In considering the orbits of other members of our Solar System we can speak of the inclination (tilt) of their orbit relative to Earth's orbit. Those two planes will intersect at two nodes (points). One node (the descending node ☋) would be when the neighboring planet is heading south when it crosses through our orbital plane, while the other (ascending node ☊) it is northbound. What is curious is that there does not seem to be a term for the point 90° farther along the orbit, where the planet would lie maximally above or below our ecliptic. For the sake of discussion, I'll call the point in the orbit where the planet lies at its greatest distance above (north) of the ecliptic as its cresting node and its southern counterpart as its sinking node.

Step 1: How far above the ecliptic does Venus lie when at its cresting (or sinking) node?  

We can readily find Venus' inclination to the ecliptic (3.4°) as well as its average distance from the Sun (a) and then calculate how far above the plane it lies (b) using basic trig:

b = a ÷ cot(θ)

Plugging in to the formula:

a (Venus-Sun distance) : 108 million km

cotangent of 3.4° = 16.8

b = 108/16.8 = 6.4 million km

Step 2: Knowing how high above the ecliptic plane Venus lies at cresting/sinking node and the distance between Earth and Venus at inferior conjunction, we can calculate the angle as seen from Earth for how far above the Sun Venus will appear in the sky: 


θ = tan-1(b ÷ c)

b (height of Venus above ecliptic): 6.4 million km

c (Earth-Venus at Inferior Conjunction): 42 million km 

tangent ratio: 6.4 ÷ 42 = 0.1524

arctan(0.1524) = 8.67°

Wow - that is almost the length of the upper bowl of Big Dipper. My observation back in January had a distance of 4.8°, a little better than half the best it could be. So having determined the "what", let's turn our attention to "when" we would see one of these inferior conjunctions where Venus is at its cresting node.

This June will mark a decade since the last time Venus transited the Sun. As you may know, these events are quite rare, occurring as a set of transits 8 years apart. In the context of our ecliptic plane and Venus' plane, the inferior conjunction must occur while Venus is moving through its ascending or descending node in order for us to see a transit. And that is why they are confined to a few days around June 8th (as it reaches its descending node) or December 8th (ascending node). If our cresting node can reasonably be assumed to occur midway between June 8 and December 8, the approximate date for it would be on March 8th. As a result, for those of us in the northern hemisphere, an early springtime inferior conjunction will be our best opportunity to catch a glimpse of our sister planet directly above the Sun. 

From a listing of past and upcoming inferior conjunctions, we have the following ones that occur in March:

March Inferior Conjunctions
3/30/2001
3/29/2009
3/25/2017
3/23/2025
3/20/2033
3/18/2041
3/15/2049

Searching online for the inferior conjunction that happens March 23, 2025 we find the difference in Declination between Venus and the Sun will be + 7.5° - adhering pretty well to our predictions. With any luck I'll be around and have a clear day to set up the scope and try yet again to image the event.

A final observation before closing out this post. As discussed in April's 2020 blog when Venus traversed the Pleaides, our sister planet takes just shy of 8 years to return to nearly the same point in our sky. We see that 8 year interval again in the table above where each subsequent inferior conjunction arrives a couple days shy of 8 years. What if we look at the most recent inferior conjunction January 8th and project it out in an unscientific way to estimate its future conjunctions by simply adding 2,920 days repeatedly to it:

January Inferior Conjunctions
1/8/2022
1/6/2030
1/4/2038
1/2/2046
12/31/2053
12/29/2061
12/27/2069
12/25/2077
12/23/2085
12/21/2093
12/20/2101
12/18/2109
12/16/2117

Hmm - the next Transit of Venus is set to occur on December 11, 2117. We didn't land on it exactly because of our estimating shortcut, but there's no doubt that the most recent inferior conjunction is gradually walking the calendar backwards to become the next transit event, gradually losing a little of its northern clearance above the Sun's limb on each conjunction until it finally ends up crossing the orb.

If you have persevered to the end of this geeky blog entry - congratulations! It's probably due in some measure to the fact that, like me and the multitude of ancient astronomers that came before us, you find the patterns and rhythms of the heavens amazing and fascinating to explore.


Sunday, January 9, 2022

Lunchtime Venus

Since late last spring Venus has been an evening star in our skies, shining brilliantly in the southwest. It was not the best of apparitions for those of us at mid-northern latitudes as it hung out in the basement of the zodiac when reaching its greatest distance from the Sun. I only managed a couple of casual observations and a single imaging attempt due to the planet often being obstructed by trees or buildings from my home observing venue.

Like all evening appearances of our sister planet, the transition from evening to morning star is defined by Venus reaching "inferior conjunction." This event, where the planet passes between Earth and the Sun, was set to occur on Saturday, January 8th around 7:40 p.m. our time. If the Earth-Venus-Sun orbital alignment were straight on we would witness Venus transiting the face of our home star at each one of these passages. But, just as we are not treated to a solar eclipse at every new Moon, Venus' orbital inclination of 3° to the ecliptic causes her to glide north or south of the Sun. Only roughly once a century do we get to witness a pair of transits, spaced eight years apart, with the most recent taking place in June of 2012.

This weekend's conjunction saw Venus skirting Sol's northern limb by about 4.5°, leading most websites such as In the Sky to state

At closest approach, Venus will appear at a separation of only 4°51' from the Sun, making it totally unobservable for several weeks while it is lost in the Sun's glare.

S&T Image Credit

In actuality, to describe it as totally unobservable is perhaps a bit of an exaggeration. It's one of those observing challenges that can be done, albeit with great care since even a brief exposure to the Sun's surface through any sort of optical aid can easily damage your retina. I've viewed Venus in the daytime before, both naked eye and with telescope, on numerous occasions, but had never attempted an Inferior Conjunction sighting. With the forecast for conjunction day looking quite good I decided to take up this challenge.

My hope was to actually get an image of the event, so I arose before dawn to mount the 6" reflector and perform an alignment. After battling some passing clouds I finally got the Celestron mount able to slew to a target with reasonable accuracy. I left the drive running and waited for my quarry to rise high enough in the eastern sky to view it. 

By 10:30 a.m. the winter Sun was well placed so I attached the camera and asked the mount to center Venus. I had placed a red filter in the optical path to help boost contrast against the bright blue sky, but the screen was still a bright, featureless canvas. I tried slowly sweeping the area a little bit to no avail. I finally removed the camera and substituted a 16mm eyepiece to see if I could make a visual sighting, but that, too, ended in failure. I reluctantly broke down the equipment and headed inside.

Not quite willing to accept defeat, while eating lunch I plotted my next attack. I considered that Venus should be positioned pretty much at the 12 o'clock position relative to the Sun's disk at this time. What if I positioned myself such that the apex of the neighbor's house blocked old Sol? Would that allow me catch Venus in the sky above the roofline with binoculars? I grabbed my trusty 7x50 Celestron binoculars and headed outside to find out. I swept the area until my arms grew tired with still no sign of the planet. As a last ditch effort I brought out the 15x70 Oberwerk binoculars to see if they might do the trick. After about five minutes - there!! A surprisingly bright, tiny crescent lying on its back was visible above the rooftop. It was a little surprising how clear one could distinguish the crescent shape and how white, like snow, the disk seemed in the blue sky. 

I hurried inside to grab the Canon and telephoto lens in hopes of capturing a shot using the same technique. When I emerged and used the Oberwerks to try to relocate Venus I struggled. Where the heck was it - I had just seen the darn thing. Then fate lent a hand when a jet billowing a contrail behind it crossed the field. Within a few seconds I had identified Venus again. Once the contrail had dissipated, it was again tough to pick out the tiny crescent. A few minutes later another jet deposited its white contrail in the vicinity, and again it became easier to pick up Venus in the field. Thinking about this I suspect that as the field jostled from my unsteady hand the planet moved with the contrail, thus becoming more apparent to my brain. Whatever the actual reason it was an undisputed truth that having the contrail in the field made picking up the planet easier.

In yet another testimony to our eyes' logarithmic response to light, the photos appear to have been a bust as well since exposures long enough to possibly pick up Venus were overexposed. The result is in a field containing a wide range of light intensities, our eyes will provide a good image whereas it is often impossible for the camera to capture it. And although I may have come away with no photographic proof of my success, the experience adds another page in my book of  amateur astronomy that I will have fond memories of.

A digital sketch of Venus & Contrail