Showing posts with label Equipment. Show all posts

Thursday, May 29, 2025

Mounting Problems

A few weeks ago, I was inspired by an ALPO webinar on daytime observing of planets, so I decided to try locating Mercury during it spring western elongation. Equipped with my Celestron CGX-L mount, I had high hopes of using its GoTo functionality for enabling me to find the planet amid the bright blue sky. However, what should have been a straightforward task quickly turned into a puzzling challenge. When I keyed in the time—just a little after noon—the mount's computer inexplicably believed it was just after midnight. As a result, daytime targets like Venus and Mercury refused to appear in the GoTo menu. After triple-checking every input and even rebooting the system multiple times, I felt equal parts baffled and frustrated.

Needing to get to the bottom of this, I opened a support ticket with Celestron. Their team responded promptly and suggested I double-check whether I was selecting AM/PM properly. While that might seem like a simple oversight, I assured them this wasn’t the issue—I had been meticulous in my entries. Notably, if I set the time to 11 a.m. instead of 12 p.m. the menu would display the expected roster of daytime planets in the sky.

The recommendation came back to update the firmware. Sounds easy enough, and there was even a link to a user’s video showing how to do it – but his mount and mine were different. Without the gory details it proved to be a process that I had to retry a couple of times before I got it right. And then, following the firmware upgrade, another issue arose where the scope would not properly return to the Home position. Another round of correspondence ending in a helpful call where the technician talked me through that issue and finally brought full resolution.

Though the experience was undeniably frustrating at times, I felt appreciation for the support Celestron provided. Their willingness to actually get on the phone and guide me in resolving the issue renewed my confidence in the brand and their equipment. Now with a little luck the next time Mercury has a decent elongation in the morning sky everything will work as expected!

The evening of the recent Lunar eclipse brought to light yet another technical snafu, this time with my iOptron HEM27 mount that I use with my Vixen scope. I planned to align the mount as soon as Polaris was out, but the iPolar software had other ideas. I’ve used it many times in the past with good results but that evening it would not display the crosshair that one must align to. Worse, the software was also crashing at times. I went with a manual alignment which worked well enough over the course of the frustrating evening which ended up in clouds engulfing the Moon moments before totality arrived.

About a week later I tried troubleshooting it. I first confirmed that the problem could be reproduced. Then I tried uninstalling and re-installing the software. Nothing worked and the software crashed upon each attempt. The next day I opened a ticket with iOptron.

Following guidance from the company, I downloaded and successfully applied a firmware update and took a new dark frame as suggested. However, to my disappointment, the core issue remained—iPolar continued to crash upon clicking the "Confirm Position One" button, as shown in a video I shared with them. I also ensured to clear the "Center of Camera" settings before testing further.

In response, iOptron Support requested details about the specific iPolar version and firmware I was using, directing me to check through their provided link. So, the back and forth continues without resolution. I am hoping that it can be resolved soon and certainly without having to send the unit back to the factory. The troubleshooting process with iOptron serves as a reminder of the challenges and patience required in astrophotography, where technical hiccups can cause you to miss opportunities to gather those photons.


Monday, March 25, 2024

Eclipse Prep Notes

Wow - I turn around and suddenly we are down to two weeks to go for the Total Solar Eclipse (TSE)! While I have been trying to read, prepare, and bullet-proof (except for weather - that's the wildcard) for the event there's still things to do on my checklist. Among the things I have checked off my list are the following:

Solar Filter: Glass or Film?

Partial Phase - Aug 21 2017
For the 2017 TSE I purchased a Seymour glass solar filter for my 80mm Vixen. That worked out pretty well, allowing me to capture photos with my Canon t6i with good clarity (click the image at left to enlarge). However, this time around in an effort to capture even more of what promises to be a stunning corona near sunspot maximum, I have purchased a used full-frame Canon body. The solar disk is smaller so I'll need sharp focus to enable enlargement without degradation.

One question in my mind was whether a good quality mylar solar film type  might yield sharper images. I invested in a Baader filter from Aegna Astro and did a side-by side comparison a couple weeks ago. The glass filter gives a slightly better color (yellow-orange) but of course our star is actually closer to white in appearance - which is how it looks with the Baader. While not a ton of difference between them, the Baader may be yielding a slightly crisper rendering of the sunspots. But on the other hand the Seymour is easier to slip on & off the scope. 

Comparing Baader film (white) to Seymour (red)

Filtered Smart Phone

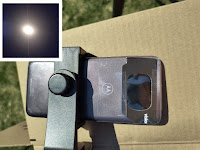
At the HAL meeting the other week I mentioned that a simple, low-tech hack for getting images of the partial phases might be trimming one of the eclipse viewing glasses into a makeshift filter taped to your smart phone. The phone I used for this was an older Motorola (Android) that I recently replaced. I cut around the filter of one of the eyeglasses and taped it to cover the camera lens, very simple and quick. Unfortunately, all my attempts to capture the Sun were wildly overexposed. The phone's camera interface supposedly did allow me to adjust the ISO and camera shutter in "Pro" mode, but I was hard pressed to see any difference. While it didn't work for me, it is still an inexpensive and easy modification to your phone, and some better phones (I am quite frugal in what I'll spend for a phone), like an Apple iPhone or Google Pixel, might allow shutter speeds that will render a proper looking Sun. I will say that it is hard to see the Sun on the camera's screen when pointing it at the Sun, so rigging up some sort of shield might pay dividends if you find your camera can snap solar images.

SETnC Trial

If you've been doing some reading about photographing an eclipse you have probably come across the advice of "don't do it, just enjoy those precious moments!" And there is truth in that statement. At the 2017 event I spent a lot of time looking at the eclipse via my pad through which I was controlling the camera. I still took time during totality to soak in the corona and twilight horizon, but not as much as I might have liked. Part of the issue was that a week before the eclipse I decided that the software I was hoping to automate taking the photos to free me up was a little to unpredictable, so I opted to go the manual route. And to be sure, I treasure those shots I took that day.

This TSE will hopefully be different. I came across the Solar Eclipse Timer and Camera controller application (SETnC) and, although the interface is a little "busy", it seemed quite straightforward and nicely programable for firing off shots during the eclipse. You specify your location and the software identifies the C1 - C4 times and provides an Excel-style grid where you define what exposures to take at specific times during the eclipse.

True to forecasts, Sunday was a cloudless day that was perfect for a full dry run - all the equipment set up as if it were the real thing. The only difference is not taking the filter off during "totality"! 😉I began the session about 12:25 pm, roughly when it will start in Texas the day of the eclipse. The software worked flawlessly, so I feel very comfortable turning over the picture taking to it during totality. I did find that while the camera battery and Celestron Power Tank for the mount lasted throughout the simulated eclipse, my laptop would come close to running out of juice near C2. That was solved by my small Jackery 300 portable battery generator.

I also discovered that the HEM27 mount gradually began to struggle tracking the Sun once it had crossed the meridian. I found to my surprise that doing the meridian flip was not as horrific as I had imagined. The main thing was picking up the laptop and walking it to its new position once the slew was finished, plus re-centering the Sun. If you haven't practiced the meridian flip and are planning to take photos, I'd strongly suggest you practice this at least once in case you find you need to do it.

Tip: Sun Centering & Solar Projection

One of the challenges in Solar observing with a telescope (or binoculars mounted on a tripod) is centering the Sun in the field. One great technique that I learned as a teenager is that by watching the shadow of your telescope/binoculars on the ground and adjusting your instrument to create the smallest possible shadow, the Sun will pop into view. Here is a video I created demonstrating the technique. 


At the March HAL meeting I also mentioned that using Solar Projection was a time-honored technique for sharing a view of the Sun with a group of people. In short, you pop in an eyepiece and direct the sunlight emerging from the eyepiece onto a white surface. You focus until you have a nice, crisp view of the Sun for all to see. This technique also works for binoculars as well, especially suitable if they can be mounted on a tripod. The main caveat is to occasionally give the telescope's optics a break and move it off the Sun for a few minutes. You can see a video of the technique here.

Activities for Maryland

Even if you are not able to get into the totality line, there are some interesting observations you can make with a deep partial eclipse such as what Maryland will experience. First, as you hit maximum eclipse (about 3:21 pm in central Maryland), can you detect any Purkinje Effect? In brief, due to the diminished sunlight, the cones in your eye are used less and the rods begin to come into play. Because the rods are more blue-light sensitive, you may notice that red and green colors lose some of their saturation. See the video below for a fuller explanation:


The second phenomenon to observe is how a thin crescent Sun will impact shadows on the ground. Shadows are normally a bit fuzzy on their edges because the Sun appears as a significant disk in our sky, not a point source. That’s in part why the shadow of one of Jupiter’s moons on its clouds is much sharper than our Moon during an eclipse since the Sun is much smaller as seen from Jupiter. If you have a rod/stick oriented tangential to the crescent, and another perpendicular to it, then the tangential one should have a sharper shadow. Check out this video for more information on this effect.


Whether you are heading out to catch totality or staying put to enjoy the deep partial eclipse, my hope is for clear skies and my #1 tip is to be sure you do your observing safely. With any luck we'll all have some wonderful stories and photos to share at HAL in upcoming meetings!

Wednesday, February 28, 2024

Full Frame Focus

We're getting close now to the big event - the April 8th Total Solar Eclipse! And as the days fly by I'm trying to finalize my strategy for getting some memorable shots while balancing my desire to also "be in the moment" during the 4+ minutes that are going to whip by in time-warp fashion.

For the 2017 eclipse I used our "family" camera - a Canon t6i - attached to my Vixen 600mm refractor. That particular model has an APC (or cropped) sensor, which has the effect of increasing the focal length. Per Fred Espenak ("Mr. Eclipse"), a cropped sensor will increase the size of the Sun in your photo by about 50%. And while I was blessed to get some very nice shots using it at the 2017 eclipse, I felt that I wanted to have a bit more space around the Sun to better capture the full extent of the corona. While the 300mm telephoto lens on the t6i would certainly do that (and worked well for the Albuquerque Annular eclipse), I like the sharp optics and higher focal length of the Vixen.

And so began my research into getting a "full frame" camera body. There are basically two options now - a standard DSLR that has a flip-mirror in the optical path, or a "mirrorless" design where the sensor feeds directly to the screen on the camera rather than looking through a view finder. The latter is still fairly expensive (IMO anyway) at over $1,300 for a decent quality unit. 


But with users switching over to the mirrorless format, I reasoned that their old cameras might be popping up on eBay. After an afternoon of evaluating the offerings I found a Canon 5D Mark II camera body for $350. Sold!

A few days later the camera arrived. The body cosmetically looked acceptable, so the next step was to charge the battery to verify it turns on and works. That test passed, but then the challenges of getting it eclipse-ready started. The first disconnect was the SD card I ordered did not fit - these older units take a much larger UDMA card. Fortunately I could find one with adequate capacity and good transfer rate.

With the camera charged and outfitted with a card I turned my attention to hooking it up to the Vixen to see if I could get some Sun pictures. While my existing T-ring that I use to hook up my Canon t6i fit the Mark II, I immediately realized that since it was a 1¼ inch design I was shooting myself in the foot by not having a 2" T-ring. A little internet searching turned up a great company, Telescope Adapters, that had just what I needed. A couple days later I had my adapter and was ready to target first Solar light for the full frame camera. On the 9th of this month that took place, and I was pretty impressed with the wider field.


The final hurdle was to integrate the camera with laptop software to automatically take a sequence of shots during the eclipse. In 2017 I had tried Eclipse Orchestrator but did not feel confident enough to let it run the session, and ended up manually taking shots via the Canon app on my tablet. That definitely impacted my ability to "be in the moment" for the eclipse (but it was still a riveting, surreal experience!) Additional research turned up the Solar Eclipse Timer and Camera Controller (SETnC) application. This seems a little simpler and hopefully will prove to instill greater confidence in turning the camera control over to it.

Last weekend I set the Vixen up again and played with the SETnC taking exposures. While setting up an exposure sequence and executing it went well, I did find that the best rate for snapping off shots is roughly 1 per second, even with the premium UDMA card. That is a bit of a disappointment as I was hoping to be able to click off at least 2 shots per second to provide some bracketing during the C2 and C3 events  (e.g., trying to capture Bailey's Beads or Diamond Ring). Given the age of the camera it is really not a surprise, but at this point I think I am going to let fate dictate the outcome and hope for some great souvenirs of my last Total Solar Eclipse. After all, luck is always a factor in any such endeavor (just ask someone who's been clouded out for their celestial event!)

Image of naked-eye sunspot AR3590
with Mark II and Vixen 80mm


Sunday, January 14, 2024

Tovala Telescopes?

Did you feel the amateur astronomy ground shift under your feet last year? While in the making for decades, AI exploded and took center stage in 2023 with the promise (or threat) of doing things for us. And while we have had "smart telescopes" such as the Unistellar eVscope since about 2020, the entry of products such as ZWO's SeeStar and Dwarf2 with a much more affordable price point of about $500 promises to be a game changer to our hobby. 

For those unfamiliar with these instruments, they abstract away most of the challenges in acquiring images of deep sky objects. Their refractor design means no worries collimating anything, and their stacking using short ~10-second captures means minimal tracking snafus. Plate-solving ensures your target is centered in the field. Polar alignment isn't required. It seems the most challenging part is just getting the unit level. The end result is that what used to be a significant threshold in terms of time and money to produce beautiful images of deep space objects has been dramatically lowered. And for those who want to refine the tiny scope's output there's the potential to download the individual subs to play with in your favorite photo processing software. The outcome - as seen here in this example from a photo Ken Sall forwarded from a FB group - is pretty astounding. 

I always grow a bit philosophical when confronted by these sort of advancements to our hobby and their impact. Progress is inevitable (especially if a profit is to be had) and often a boon to us. GoTo technology allows one to be far more efficient in an observing session and obviates the need to employ star-hoping skills. And who would want to go back to capturing photons on film save for the nostalgia of it? (I can smell the pungent aroma of the darkroom's stop-bath  as I typed that...)

And yet - does this sort of quantum leap remove some of the essence of why we take those photos? What is it that pulls us out under the stars in the first place? One approach to answering that question might be to consider Maslow's Hierarchy of Needs in which the 20th century psychologist postulated what makes us tick. The hierarchy is often shown as a pyramid in which a person works their way up from the bottom towards the top. The base of the pyramid deals with one's physical needs - food, shelter, safety. Once those are met we are free to move higher up to psychological needs of friendships and esteem. At the pyramid's pinnacle we have creative activities. Certainly it is in those areas that we find the impetus for people joining our hobby. 

Like most hobbies, astronomy certainly offers the opportunity for community and friendships that often accompany it. That is the raison d'etre for HAL. And, at the moment at least, there is a bond among SeeStar owners as they share their experiences using the scope that isn't seen for most other types of scopes. 

But how do the EAA telescopes fare in terms of fulfilling the esteem and creativity motivators within us? Their popularity would argue they indeed can provide their owners with a sense of pride and spirit of creativity as they image the wonders of the universe. That image of M42 demonstrates that. But over the long haul will that hold up? Those who delve into the processing of the little scope's stack of images to enhance and amplify the resulting photograph will likely continue to have those esteem and creative itches scratched. But for the person whose input is mostly just telling the machine what to target, I suspect that their initial psychological rewards will fade once the sky has done a full turn. Will we see a plethora of eBay listings of these scopes in a couple years?

There is another aspect that is, to me, a little unsettling. How ironic that a telescope calling itself SeeStar actually doesn't allow you to peer through it! There is a wonderful sense of awe peering through the eyepiece at the universe. Some targets, such as Saturn, need no introduction and can become an experience you'll always remember. Others, like seeing the stellar point of light at the center of galaxy M77 and knowing it represents an active galactic nucleus powered by a black hole, are more subtle but just as profound. Many of us also delight in the success of catching a glimpse of a challenging object such as discerning the active star forming region NGC 604 within the Triangulum galaxy or sleuthing out which faint star is actually distant Pluto. I suspect that we can thank another form of progress - light pollution - for the making such things more difficult and fueling our desire to swap out our eyes for the CMOS photon sponges.

All this being said, I need to disclose I've never used one of these scopes - perhaps I'd become their evangelist upon using one! I do sincerely hope that they bring hours of enjoyment to their owners and help grow the ranks of our amateur astronomy community. In our recent HAL board meetings discussing whether we should acquire a unit for club use, I was a solid "aye" vote in the matter (and my thanks to Grace Coventry for her efforts on making that a reality for us). If EAA entices people away from mindless scrolling on social media and brings them out under the night sky for a semi-virtual exploration of the heavens, then it is a huge win - not only for the hobby but for that individual as well.

Saturday, December 31, 2022

The Pixel Sweet Spot

Earlier this week the forecast was for an evening of average to perhaps better than average seeing with cold (but not biting) temps. I rolled out the scope a little before sunset to begin cooling and got things ready - with Jupiter just past quadrature it is always going to be highest in the sky as soon as it becomes visible. 

I did the routine alignment, collimation check, and finder alignment before finally popping in the ZWO camera. Activating the camera I was greeted by a strange sight - an emerald green Jupiter. At first I thought maybe a Debayer setting was off in the capture interface but soon noticed that the histogram was not registering in blue or red, only green. I rebooted the laptop hoping maybe that would restore things, but no luck. I brought up a different capture application, but it, too, sported a green globe.

Rather than admit defeat I located my retired Imaging Source camera and popped it into the Barlow. The view and histogram confirmed that we were back to getting a color image, but I immediately was struck by how much smaller the image appeared to be. Hmm - what was that about?

It turns out that my older camera, a DFK21AU042, has a pixel size of 5.6µ whereas my ASI178MC has a size of less than half that, checking in at 2.4µ. The formula for calculating how much sky each pixel registers for your setup is as follows:

  (Pixel Size/Telescope Focal Length) * 206.265  

For my setup using a 2.5x Barlow that becomes:

DFK21AU042 = 0.31"

ASI178MC = 0.13"

The theoretical ideal for planetary imaging for under average seeing conditions is around 0.15" per pixel (Note that this is different than DSO imaging, where the average is about 1-2" per pixel). Clearly, my ZWO camera is a lot closer to the mark, and the better thing to have done would have been to stop and swap out my 2.5x Barlow for my 4x one to get a little lower arc-second/pixel value. But the window of calm seeing that we often get shortly after sundown wouldn't allow that, so I forged ahead.

Below are comparative images taken about a week apart of roughly the same Jovian longitude. It is pretty obvious from it that we lose resolution in the image acquired using the DFK21AU042 camera.


Is the image from the older camera terrible? No, hardly. We can still make out details like Oval BA and anti-cyclone storm A1 - something that was unheard of using film a few decades ago. But in astronomy, and in planetary imaging in particular, it is all about getting all the parameters as ideal as possible so that you can capture all the details available given the seeing conditions. Hopefully I get my ZWO camera fixed, but in the meantime I know from experience now to at least break out the 4x Barlow to try to get closer to that desired arc-second/pixel value.


Sunday, June 19, 2022

Fine Focus

For any astro-imager, focus is always a primary concern. When doing deep sky it has to be spot on to get those tack sharp stars that we love to see. Fortunately for DSO imagers, there are aids such as a Bathinov mask that can help ensure you are on the mark.

Bahtinov Mask

 In planetary imaging it is a little more challenging. We also need to be in perfect focus to capture the subtle details, but a Bathinov mask isn't going to work on a non-point light source. Trying to move the scope to a bright star to focus first before centering the planet also seems to fall short. What one is left with is manually fiddling with the focus knob while watching a feature of the planet to get it as sharp as possible. For example, a Jovian moon or the Cassini division are often good targets to pay attention to in this effort.

Unfortunately the planetary imager is confronted with another problem: the high magnification utilized to get the planet's disk to a suitable size. This means that the slightest touch causes the planet to wildly dance in (and sometime exit from) the field. The result is an iterative set of focus-recenter-evaluate attempts until you feel it is as good as you can get (or your patience is gone and you settle for "close enough"). When rebuilding the OTA for my 10" Cyrus1 Newtonian I even invested in a nice JMI focuser with a feather touch micro-focuser, but it still didn't solve the fallout of a human hand touching the scope.

I finally came to accept that investing in a motorized focuser was going to be necessary to solve the problem. Based on the positive experience Dale Ghent had with MoonLite focusers for HALO, I opted to order from them. It takes a bit of time to go through all the various options but I eventually balanced my desire for bells & whistles with my budget to get a Crayford 2" focuser with their universal adapter and stepper motor for about $700. To my surprise and delight they had the unit to me within about a week.

Next came replacing the existing JMI with this snazzy unit. If you look at their universal adapter, it is "a plate with multiple many different 4 bolt hole patterns for Newts over the years, Meade, GSO, Orion, Celestron, etc." 


However, none of them aligned with the existing holes I had placed into the tube when installing the JMI focuser. So it became a tedious process of securing the plate with a couple of openings that did align and then trying to accurately measure where the new hole had to be drilled to accommodate where the opening was on the plate. After a couple of hours the plate was finally secured and motorized focuser attached. 


Installed MoonLite Focuser

As you can see from the picture above, this is a substantial unit. It occurred to me that this would probably alter the scope's balance once I added in the Barlow, camera, and possibly an Atmospheric Dispersion Corrector (ADC). In the past the scope had always been a little "rear heavy" when imaging, requiring placement of a magnetic weight along a shelf bracket that runs along the front half of the tube. I opted to install a similar bracket along the back half of the scope, and indeed it was needed to achieve balance when I did a dry run.


A couple weeks later with Jupiter and Saturn getting a reasonable (if not great) altitude in the pre-dawn skies, I gave the MoonLite unit a test run. I did not purchase a separate hand controller to operate the focuser but instead attached it to the laptop using the provided USB cable. The unit also has to be powered - so yet another cord dangling from the focuser that I tried to tuck alongside the scope to avoid any tension or vibration it might cause.


The interface is pretty intuitive, allowing you to move in or out by orders of magnitude. Once Saturn was centered it was easy to display the planet in the video capture software and have the MoonLite Single Focuser app on top so that I could watch the planet as I commanded the focuser to adjust its position. During the process there was minimal movement of the planet and no risk of knocking it out of the field. I ended up getting what I felt was as good a focus as I could achieve and was happy with the result after I processed the video captures the next day (below). 

While the swapping out of the original JMI for the MoonLite ended up being a little challenging in the installation stage, I'm very happy (and blessed) that I could do it because the results are what I was looking for - a far less painful and far more accurate focusing experience. Like so many other hobbies, amateur astronomy (especially when coupled with photography) is an investment. It seems to be a continuous process of identifying what might improve our ability to see or photograph the heavens and then budgeting to make that next upgrade.


1 I call it the "Cyrus" telescope because the optics were made by Charles Cyrus, a friend and excellent ATM from back in my days with the Baltimore Astronomical Society. After Charlie's passing his instrument made its way to me and I have enjoyed it for a couple of decades now, most recently redoing the OTA that houses the mirror.

Thursday, March 17, 2022

A Filtered Experience

The topic for the HAL meeting this evening was "filters", which is a pretty big topic! After all, we have filters for visual use vs. imaging use, and then filters for specific targets from faint DSO to our brilliant Sun. Hopefully I provided a little insight at the session based on my personal experiences, especially as to planetary observing.

Back in '65 when I got my first scope, a classic 60mm refractor with .965" high-powered eyepiece, I knew one thing for sure that I really wanted to see was Jupiter's Great Red Spot. The scope showed the planet as a fuzzy disk with slight rainbow fringe, perhaps a stripe or two upon it, but no GRS in sight on the multiple occasions I target the giant planet. Somewhere - probably a library book that I had borrowed - I read how a blue filter would darken the GRS and therefore make it stand out better. Clearly that would make my target materialize in the eyepiece!

My dad was a local pharmacist and contracted with a camera shop down on Falls Road to provide film developing service for his customers. He was supportive of my hobby (so long as I didn't get the foolish idea that I could make a living looking at stars) and helped me to get a 2x2"Wratten 80A blue gelatin sheet and a mounting ring for the filter that was just a little smaller than the internal diameter of the refractor's dew shield. I carefully cut out my circle of blue, mounted it in the holder, dropped it into the front end of the scope and then waited for the next clear night. 

The view of Jupiter was quite pretty with its blue hue, but even after several attempts on different nights I still could see no GRS. (Of course, I am assuming that just by the odds I would have seen it on one of those evenings. I had not discovered Sky & Telescope with its listing of GRS transits yet, and online lookup would have been the glorious stuff of science fiction in the mid-60s). While filters lost a little of their charm from the experience, I felt that the principle was certainly sound. Reddish features would have their light blocked by a complementary blue filter, making them darker and easier to see. I began to suspect (correctly) that it was more an issue of small aperture than filter failure.


When I graduated to my 6" Newtonian I was finally able to catch sight of the Great Red Spot one evening without a filter. It had fairly good intensity back in the late 60's - similar to its appearance now. The availability of a glass filter that would screw into the bottom of the eyepiece was (as far as I knew) nonexistent. So no filters for visual inspection of my planetary quarry at that point in time.

But by now I was starting to play with using a second-hand Minolta range-finder camera to take pictures using the afocal method. Talk about a tedious hit or miss approach! You had to line up the camera over the eyepiece at where you think you are at focus, then hopefully get the planet in the field just based on the 6x30 finder scope, and finally snap the picture with a cable release while hopefully not jiggling the scope. Despite all that, I had occasional success with the technique. It also drove me to learn how to do my own B&W development rather than watch the photo lab assume nothing was on the roll of film and slice right through my field when trimming the negatives.

By this point I'm a HS freshman, networking with fellow amateurs at the Baltimore Astronomical Society and with enough pocket money from working at the pharmacy to buy some hobby stuff. I got another filter holder that would attach to the front of the Minolta and outfitted it with a Wratten blue gelatin. And then on a May evening in 1970 I did it - I actually captured the GRS photographically, a dark spot near the planet's central meridian. It was an OMG!! moment as I inspected that roll of film while hanging it up to dry. 

Jupiter - afocal method with 6" f/8 RV-6 at 140x
using Minolta camera with 80A filter

It was probably shortly after this that I began to find retailers of glass Wratten filters that we are so familiar with today. I started my collection with a #80A blue and it gradually expanded like a rainbow. Over the years I have found that, for visual planetary observing, they are not going the wow you like an O-III filter can do on an emission nebula. But they can be helpful if you approach their potential realistically, i.e., a tool that can improve the contrast of notoriously low-contrast planetary features. In addition, they do not cost an arm and a leg (at least not for the basic Wratten glass filters that almost any good astronomical supply house will carry).

Although I am given over more to imaging a planet rather than sketching it these days, I still do enjoy at the end of the session taking a few minutes to gaze upon my target before putting away the equipment. In doing so I'll almost always apply a filter in an effort to see the most that I can. Here are my common go-to filters using my 10" reflector (if you have a smaller scope then a corresponding filter with higher transmission rate may be a better fit):

The brilliance of our sister planet Venus means you have to knock down the glare significantly to be able to appreciate the disk. I often use a #47 Violet with only 13% transmission to accomplish that. The most I have been able to make out on Venus is some brightening at one or both polar regions ("cusp caps").

When Mars comes calling every other year it is a fun target and arguably one of the best for filter enhancement. The #80A medium blue is helpful in seeing the polar ice caps and lighter orthographic clouds that sometimes form. A light red #23A helps to darken the albedo features and boost their contrast. I have also found a deep yellow #15 to be a nice choice to reduce the planet's brightness and boost overall contrast.

Mars through my 6" f/8 RV-6 & Red #23A filter 10/7/2020


Jupiter is an absolute favorite for me given how dynamic it is. I have always found a yellow filter (#15 deep yellow or #11 yellow) as a good, all purpose aid to improving the contrast of the belts against the lighter zones. A pale blue (#82A) or medium blue (#80A) are helpful as well, especially with the Great Red Spot (the pale blue improves the contrast yet you can still pick out some of the red overtones to it).

While not as subtle as features among Venusian cloud tops, Saturn offers delicate features with its gradually darkening belts as you move from bright equatorial zone to dark polar hexagon. Again, a yellow filter seems to work well for improving the contrast a bit on the globe. 

Based on a very interesting "consumer reports" article on Cloudy Nights where author William A. Paolini compared multiple filters to find the ones that seemed to be the best for accentuating planetary detail, I have recently purchased a Baader Contrast-Booster filter. Now I just need to wait for this fall when we'll have Mars, Jupiter, and Saturn available for my own assessment of how well it does. 

If planetary observation is something you enjoy then you really should play around with some filters to see if they help you pick out some of the subtler details. Most retailers offer the Wratten color filters for under $20, and so long as you are not expecting miracles to happen, you'll likely find them an interesting and enjoyable accessory to have in your observing armamentarium. 

Wednesday, September 29, 2021

A Camera Upgrade

Like most enthusiastic amateur astronomers I have a long list of gadgets and upgrades I'd like to acquire. But until I hit the lottery I have to prioritize these things. High on the list has been to replace my nearly ten years old planetary video camera. An ImagingSource DFK21AU042 color camera, it has served well and still can acquire good images of the brighter planets. But with a maximum frames per second (fps) of 60 (and 30 for dimmer Saturn), I feel the need for speed.

Based on what I've seen posting images to the ALPO gallery as well as some Internet research, I concluded that a ZWO camera would be a reasonable brand to go with. Another relatively easy decision was to get a color camera again. A monochrome, using R-B-G filters to create a final image, certainly offers better results, but it significantly increases the amount of time to acquire and process the files. And of course there is the several hundred dollars of investment in a filter wheel and those filters. I need to keep it a bit simpler, at least for now.

My other two primary criteria were a smaller pixel size and the ability to achieve a fps rate above 60. Fortunately ZWO does offer a nice comparison grid to see the differences among their many products. I finally settled on the ASI178MC with its 2.4µm pixel size (less than half the size in my existing camera) and potential fps greater than 100. I tried initially to order from distributors in the US but everyone was back-ordered, whereas ordering from ZWO directly I had my camera in about a week.

The first clear night (surprisingly I did not get the month of clouds curse that often accompanies new equipment purchases) I targeted Jupiter and Saturn with the Cyrus 10" reflector and the ASI178. FireCapture immediately recognized the camera, but I was stymied in getting the frame rate to exceed 60 fps, even with cropping the region of interest (ROI). But even so I was happy to see I could image Saturn at that rate which my old camera never achieved.

Saturn using the ASI178

A little more research provided some insight as to what might have been blocking the higher frame rates. The camera can run in either 14 bit or 11 bit color modes. The smaller color palette of the 11 bit allows a higher rate - but there was no way (that I could find at least) to specify the bit level using FireCapture. I downloaded the free ZWO interface, ASICap, and readied my laptop to use it the next clear evening.

The ASICap did the trick. As soon as I switched to 11 bit mode the frame rates could be boosted significantly, up to 150 fps on Jupiter with a tightly cropped ROI. With a faster speed there is a greater chance of catching more of those milliseconds long windows of stable seeing, hopefully leading to more sharp images in the sample. Of course seeing has a lot to do with the outcome regardless of fps, and so far I've not had a really good night of steady skies.

One unforeseen (but predictable) consequence of the higher frame rate is the much larger video file that is produced. Previously a 2 minute run on Jupiter yielded about a 2-3 GB AVI file, but now I am producing files that hit 7-9 GB in size. This then leads to a storage issue with no really great solution (at least not suitable economically). I will probably fill up my 2nd TB of online storage by October, so I will have to come up with a plan. Right now I am thinking of starting to rate the video captures in terms of quality and interest with an eye to discarding those below a certain rank (contrary to my planetary video hoarding tendency). 

ASI178 at work


One unexpected benefit with using the ASI178 is the much larger field one can start at, making it much easier to find the target, center it, and only then reduce your ROI to have it fill most of the frame.

In terms of the ASICap interface, while it is workable I still prefer FireCapture. For one thing I like having the ability to briefly pause the capture and nudge my target back into the field if it has drifted out. I also find the more prominent display of the metrics during capture (fps, elapsed time, file size) much easier than the small font at the bottom of the ASICap screen. I also like that everything of importance fits on the FireCapture screen whereas I find myself scrolling a good deal in ASICap. 

Hopefully an evening with some steady seeing will present itself soon so that I can get a true sense of what the camera can achieve. In the meantime, as often happens when I have new equipment, I plan on spending some time searching CloudyNights and YouTube for tips and advice from my fellow planetary imagers.