Showing posts with label Lucky Imaging. Show all posts

Sunday, August 24, 2025

Mercury!

As an avid planetary imager, I've had my fair share of accomplishments, but Mercury has always eluded me. One of my goals for 2025 was to end that frustration and finally capture an image of the smallest planet in our solar system. This current mid-to-late August apparition offered the best opportunity of the year. Fall morning apparitions provide the most favorable geometry, with the planet's solar separation translating to vertical height above the horizon due to the inclination of the ecliptic in the autumnal pre-dawn sky.

Due to the trees (which need trimming this winter), Mercury must reach about 40° altitude to clear them, necessitating a daytime observation. That’s not too difficult for Venus, but it posed a bigger challenge for Mercury, which isn’t visible in the finder scope. Fortunately, the ALPO webinar last spring on daytime planetary imaging provided valuable tips and encouragement, confirming that I had the equipment and skills needed for success.

The weather from spring through much of summer this year was dismal. Clouds were the norm, and even when the skies cleared, seeing conditions were often below average or marred by smoke from the Canadian wildfires. So when a forecast for below-average transparency but average seeing presented itself on August 17th during the favorable morning apparition, I decided to commit to an imaging run.

I stepped out at 4 a.m. to align my telescope, only to be greeted by a strong haze that limited visibility to 2nd magnitude stars. By 9 a.m., the clouds had worsened, making it difficult to even spot the fat crescent Moon. However, I managed to bring Mercury into the camera’s field of view and run some captures. The resulting image showed a chubby crescent phase with little to no discernible albedo features - a technical success, but not truly satisfying.


With a forecast for better transparency and above-average seeing on the morning of Saturday, August 23rd, I decided to give it another shot, with Mercury just past dichotomy. I set up my scope to cool and went to bed Friday evening, again waking at 4 a.m. to align the CGX-L mount. The alignment was good enough to bring targets into the low-power view. After aligning, I did a couple of lucky imaging runs on Saturn in color under pretty good seeing conditions. I then moved on to Jupiter for more practice and captured an IR image as dawn approached.

Then, despite being plugged in, my laptop died unexpectedly. Clearly, the recently purchased AC adapter will need to be returned. Frustrated, I took it back upstairs to charge while waiting for Mercury to clear the tree line at 8 a.m.

Returning to the driveway, I was pleased to see clear blue skies with only minor clouds. The morning breeze was gentle, and transparency and seeing conditions seemed promising. I started by slewing to Venus to practice my hand controller motions, ensuring that one short press to the right and 2–3 presses up would bring the slewed object into range.

Finally, I slewed to Mercury for the moment of truth—and the planet popped into view! Initially, it looked turbulent, but after adjusting the focus manually and using SharpCap’s Fourier Detail Detection routine, I was able to achieve a good focus. The strong surface brightness of the innermost planet allowed for high frame rates, and I adjusted the exposure, gain, and region of interest to achieve over 100 frames per second.

The planet danced wildly due to the rising Sun and atmospheric currents, with only fleeting moments where the half-moon phase was discernible. I captured a series of three 3-minute videos at 3ms exposure and a gain of 180, followed by experimentation with higher gain and lower exposure to increase the frame rate. In total, I captured about 20 minutes of video.

Processing the data later that day revealed good-quality images, with sufficient seeing to produce a reasonable stack. I whittled down nearly 64,000 frames from the 3ms videos to create a nice image. I also experimented with AstroSurface for the first time to sharpen the result and was pleased with the tool.


While this face of Mercury lacked high-contrast albedo features, my image showed a mottled surface, reflecting large-scale features. After all, at only 6.6 arcseconds in size, I’m targeting something roughly the size of a tomato seed viewed from across a football field! With this success under my belt, I’m looking forward to making Mercury imaging an annual event—weather permitting!


Friday, February 28, 2025

Leveraging Starlight for Sharpening Planets

The field of digital planetary imaging is where art meets science, particularly in post-processing. After using our preferred tools to distill a video of several thousand frames into a stacked and aligned image, there is still much work to do. We need to refine it into a sharpened view of the target before applying some tweaks in a program like Photoshop. To achieve that sharpened image, we have two techniques at our disposal: wavelet sharpening and deconvolution.

Wavelet sharpening is a key feature of the freeware application Registax6, a staple of planetary imagers for many years. The author of the software, Cor Berrevoets, has not issued an update to the venerable program since 2011. He has, however, created a successor in the form of another freeware application called waveSharp. Both of these tools decompose the selected image into layers - from large-scale components of the image to fine scale. By adjusting the sliders, you can selectively enhance these aspects of your image. The finer scale adjustments must be done with a light touch to avoid introducing significant noise to the final result. Fortunately, one can combat the noise by suppressing the finer scale adjustment.

The ability to apply deconvolution is appearing in more tools for the planetary imager. One excellent new addition is the Lucky Stack Worker (LSW) freeware application (a video by the author, Wilco Kasteleijn, is on the ALPO channel). Another is AstroSurface, an application with extensive filters and functions for not only the planetary imager but the deep sky enthusiast as well.

So, what is deconvolution? In brief, it is using a contemporary representation of an Airy disk to help recover detail lost through atmospheric turbulence, soft focus, or optical issues. Under perfect conditions, when examining a moderately bright star, you would expect to see a small disk with diffraction rings emanating from it, known as its Point Spread Function (PSF). The interface on the LSW has two checkboxes - one for "Deconvolve" and one for "Sharpen" (i.e., wavelet sharpening). If we select the Deconvolve and select the "bullseye" adjacent to it, we see that LSW is offering us a synthetic PSF with sliders to allow us to adjust it.

Impacts when adjusting the Seeing Index slider

You could take a few minutes before or after your imaging run to inspect a nearby star and make a note of its Airy disk appearance to emulate it in the synthetic version. But why not record an image to capture the PSF for that particular imaging session? This is exactly the sort of thing that Wilco Kasteleijn advocates in the LSW manual and references a nice article by Marco Lorenzi on how to do this.

A couple of nights ago, Astropheric was displaying that the seeing would be "average" with temperatures in the 40s, so it was an opportunity to try this technique and maybe gain some experience acquiring a PSF image to leverage in my processing. Like a deep sky flat frame, the PSF image should be taken with the same imaging setup and without pointing the telescope too far from the target.

My first attempt using a star near Jupiter did not yield results, as it ended up being too faint and requiring a longer exposure. That, in turn, blurred the Airy disk by its scintillation. For Mars, I targeted a brighter star and had more success with a frames-per-second rate nearing 100. Even so, it is challenging to get it right; in retrospect, I should have lowered the gain further to avoid "blowing out" the Airy disk.

The PSF image taken during the imaging run

So, here are the results! Even with only a fair PSF image processed by Autostakkert, the LSW did a nice job of recovering the details from what turned out to be sub-par seeing. Applying sharpening and denoising to the image resulted in a reasonable, if not admirable, image showing albedo features, the polar cap, and likely cloud features.


To me, this technique of capturing a PSF image as part of the Lucky Imaging session holds great promise. As a final note, here is a Copilot-assisted comparison of how these two techniques help us achieve fantastic planetary images.


Monday, December 18, 2023

When Smaller Is Better

Venus is a notorious tease. Her brilliance in the deepening twilight sky is a lure to any beginning astronomer, yet nearly all come away disappointed after centering the planet in the eyepiece. No details are to be had (at least none to an untrained eye without the aid of a filter) other than the changing phase of a featureless cue ball. 

The exception is when we view Venus in UV light. Thanks to an as yet unknown compound in the Venusian atmosphere that absorbs ultraviolet light the planet shows structure in its omnipresent cloud deck. As we know, UV is not something our eyes can discern. The best we can do visually is to apply a violet filter such as a Wratten #47 that reduces the glare a teases out a tiny bit of that structure as low contrast shadings. Most common of these (and with a scientific rationale for their existence) are the "cusp caps" seen at either or both poles.

All is not lost, however. The amateur who has outfitted his rig for planetary imaging can take advantage of the fact that the camera's sensor can record in UV. Some cameras are better than others in terms of their sensitivity in the UV portion of the spectrum, but even if you do not happen to have one of the more UV friendly models the odds are good that with the addition of an ultraviolet filter you can capture some details. A little over a year ago I purchased an Astrodon UVenus filter to pair with my ZWO ASI178MC (color) camera to see if I could capture the cloud patterns, and was delighted to have success earlier this year.

In researching the best approach to obtaining a good image of Venus in UV one of the tips that I ran across was to avoid lenses in the optical path. The anti-reflection coatings on them can apparently cut down on the UV transmission, making the image dimmer (and consequently requiring a lower frames-per-second rate that introduces atmospheric smearing). It has also been noted that the corrector plate on an SCT is not designed to provide correction in the UV range, so that design may be a bit handicapped when attempting UV capture.1

Another factor I have noticed is that while you can detect cloud markings when Venus has become a large but slender crescent on either side of an inferior conjunction, the results seem far more interesting when the phase is somewhere greater than 35%. Enough of the disk is presented to allow one to often capture cups caps/collars as well as streaks in the middle of the planet that a crescent won't show.

My recent session a couple weeks ago was under average seeing with only fair transparency. Our sister planet was sporting a 70% phase and a diameter of only 16" as the planet continues to pull away from us following last August's inferior conjunction. Having to forego the 2.5x Barlow means it is a small image that one gets to work with, but it was clear even on the laptop screen during capture that the cusp caps were visible. Post processing can afford some help in enlarging the image (such as adding drizzle in AutoStakkert3!, leveraging the resizing functionality in Registax, or even using a custom resizing application like Topaz's GigaPixel product).


Since I had the time I decided to do a second capture, but this time with the Tele Vue 2.5x Powermate Barlow in the imaging train. I could immediately see the impact in terms of a dimer image, dropping my fps from 32 down to 9. This of course allows more time for atmospheric blurring to occur, reducing the number of frames of steady seeing that can be harvested. 


So while the image was certainly larger, the attenuation of UV light by the Barlow gave an image with far less clarity. Yes, the cusp caps are there, but the details in the smaller image, even after undergoing enlargement, were far superior. The verdict was clear - leave the Barlow in the box and work with whatever size we have to get the best UV image of the elusive Venusian cloud details.

1 https://www.thefreelibrary.com/Imaging+Venus+in+the+ultraviolet%3a+a+new+development.-a0357147028 


Tuesday, October 10, 2023

Not Feeling Lucky

"Diligence is the mother of good luck." - Ben Franklin

I guess it's been the better part of a decade since I first encountered the term "lucky imaging" that is used in amateur astronomy to characterize the technique of stacking and enhancing video frames to produce the stunning planetary, lunar, and solar images that we see so often today. The moniker derives from the fact that we are able to extract those brief, "lucky" moments when the seeing has steadied for a split second to create a photo that reveals details the eye could never behold. Indeed, not just our eyes, but those of us old enough to have tried capture using film greatly appreciate the superior results (and in many ways the simplicity) of using this digital video approach.


While the term has a rational basis for its origin, I have to confess it has never sat quite right with me. Using it connotates that I pointed my telescope at my target, yelled "action!" and hoped for the best. If the imaging gods smiled on me then I was rewarded with a detailed image of  Mars revealing Olympus Mons or kilometer-sized craters on the floor Plato. If they did not I was left with a fuzzy outcome that no amount of post-processing could salvage. Better luck next time kid! 

Of course, any serious solar system imager knows that aside from decent seeing, luck is a rather small component of creating a nice capture of your target. There is the research into what equipment to use and the financial investment in acquiring it. That equipment then often needs a knowledgeable and skilled hand for optical alignment (collimation) to wring every last sub-arcsecond detail from our quarry. Once that is checked one needs to engage in a successful polar alignment to enable tracking of the object at high magnification. If an Atmospheric Distortion Corrector (ADC) in your imaging train then that, too, must be adjusted throughout the imaging session to combat the subtle smearing that occurs when light travels through our home planet's blanket of air. 

One of the biggest challenges is achieving a sharp focus. "Lucky" imagers do not get the benefit of a Bahtinov mask to provide the assurance that they have a crisp image. The user must study the image on the screen to identify a high-contrast feature to zero in on and then twiddle the knob incrementally back and forth while evaluating the outcome after each minute adjustment. If being done by hand that means waiting a few moments after each tweak for the target to stop dancing around the field. (Those of us who have outfitted our scope with an electronic focuser would never part with it!) 


Once collimated, polar aligned, and focused it's on to setting up the gain and exposure in the software's capture interface. Having the fastest possible shutter speed while holding the graininess of the capture at bay is another balancing act that the imager has to perform. Finally, we're ready to capture some video!

With gigabytes of data safely stored on the hard drive you're halfway home. Next comes the post-processing effort where we transform those thousands of frames into a single thing of beauty. But between those two points lies a bevy of software products to perform that magical massage, and the time to learn how to use them. One of the most critical stages, the wavelet sharpening, is part science but very heavy on art. Here the observer must use their skills to sharpen the stacked outcome in such a way as to provide the clearest view that does not introduce artifacts into the final product. Only after all this effort based upon investment in equipment, study, and experience does the reward of a detailed photograph of a member of the solar system emerge. 

Lucky? Really? 

I may be tilting at windmills here, but I am launching a campaign to retire the "lucky imaging" description for a more appropriate acronym. I asked the question on the Cloudy Nights forum and got some interesting (and humorous!) suggestions along with pretty universal support to call our technique something else. Some of them contained the word "planetary" in the acronym, which would describe most of my personal effort but snub the amazing work done by Solar and Lunar imagers. After collecting descriptive terms and jockeying them around I think I finally have the replacement acronym:

Solar, Planetary, and Lunar Imaging Capture & Enhancement (SPLICE)

Not only does it cover the targets for which we most often apply the technique, the "splice" has a slight double entendre in that in many ways that is at the heart of what we do - gather the best parts of our movie and then splice them together for our finished product. 

Coming up with a suitable acronym is certainly the easier part of this effort. The real challenge will be to get our favorite print publications (and other influencers such as podcasters and YouTube creators) to adopt it. It's up to us to ask them to remove "lucky imaging" from the amateur astronomy lexicon!

Monday, July 31, 2023

Registax Heir

 A critical part of the planetary computer assisted video imaging (CAVI) - aka "lucky imaging" - is the sharpening of the stacked and aligned image with wavelets. It can seem like a black art as you push and pull levers to apply various wavelet changes to the image to make it clearer. There is also a huge amount of art here, where one balances between a heavily processed and artificial looking output vs. one that has left details on the table that should be brought out.

Registax has been the de facto freeware for the application of wavelet sharpening for quite some time. However, the last release was in 2010 - a virtual lifetime when it comes to a software product. As a result there have been alternatives emerging that the amateur imager may want to evaluate.

One of the new kids is waveSharp, and part of the attraction is that this is an open source project by Cor Berrevoets, one of the primary forces in the development of Registax. As stated in his announcement on CloudyNights of the availability of waveSharp at the end of last January,  

(Registax) was developed in 2011 only for windows 32bit computers, waveSharp is developed for 64bit computers and multiple operating systems (WIN64, LINUX, MACOS). Therefore this application is only meant to sharpen/enhance images that have been created using other software (alignment/stacking).

You can download the compiled executable for placement on your computer at the project's GitHub repository.


The interface is pretty clean, allowing you to open your image and then use sliders to apply the strength of your wavelets. Unlike Registax we have only 3 sliders, with the first one affecting the small-level detail, the third increasing the contrast on larger scale features. The "Denoise" (smoothing) sliders are not activated by default but must have their checkbox selected. 

The user also can select one of three filters to apply. Gaussian appears to be very similar to Registax, with the changes slow and gradual to create a sharpened image. ZeroGauss is quite strong, with minor adjustments having significant effects. The third choice, Bilateral, is supposed to help avoid the "rind" effect that we often see in planets like Venus and Mars with bright limbs. 

I've been using waveSharp for about two months now and have been very impressed with it. The changes are applied quickly (possibly a reflection of its 64-bit architecture) and the various filters are a nice touch. You can also save your settings and recall them for application to new images. The one thing that is probably not as easy as Registax is correcting RGB alignment (atmospheric distortion) to your image - it appears to be more automated in Registax. 

Change is inevitable but not always positive. While waveSharp is still in its early development it seems to be a suitable heir to the venerable Registax - give it a try!

Monday, May 22, 2023

Ultra Venus

Perhaps no other object has such a wide gulf between its naked eye impression compared to its appearance in a telescope than Venus. In our twilight sky Venus demands attention, shining like a brilliant diamond. Whenever the crescent Moon stops by for a visit, I am always up for grabbing a few shots (even though I already have many prior encounters documented). And when our sister planet pairs with another planet (as it did earlier this year with Jupiter) or the Pleiades, amateur astronomers turn into paparazzi and flood the online galleries with their glamor shots.

Venus & Jupiter Feb 28, 2023

But few of those amateur astronomers will tarry very long with Venus in the eyepiece. The view is that of a dazzling, featureless cue ball emulating one of the Moon’s phases. Nothing stands out so it’s a quick check-in and on to something of greater interest.

With patience and some filtering there is more to see. A deep violet Wratten #47 filter not only knocks down the glare but provides subtle boost to the very low contrast features in the Venusian clouds. While at times one might make out a dusky region on the planet, the most common feature that appears is a brighter region at one (or both) of the poles. Know as a “cusp cap” it is an actual feature and not just an artifact manufactured by our brain. Large Hadley cells rise high into the atmosphere from the hot equatorial regions and then sink back down in the high temperate latitudes, forming a slightly darker “cusp collar” bordering the cooler cusp cap.

Planetary imagers also find themselves stymied by Venus’ reluctance to share features. Like most others, my prior attempts to record details on the 2nd rock from the Sun using “lucky imaging” techniques produced crisp but bland captures of the globe.


Our professional brethren have also struggled with Venus until about a century ago when astronomer Frank Elmore Ross targeted it using Mount Wilson's 60- & 100-inch reflectors. His gig before that was a decade at Eastman Kodak studying photographic emulsions and filters, which led him to make photographs in IR and the newly released UV filter. While the IR failed to penetrate the cloud layer to show details as he had hoped, the UV unexpectedly did. Curiously, there was not much follow up to his discovery until images acquired by French amateur Charles Boyer nailed down a rotation period of about 4 days. His results were published in 1960 in Icarus (and rejected by none other than Carl Sagan). While radar data eventually established a retrograde rotation of 243 days for the planet, Boyer’s observations of a 4-day “super-rotation” of the Venusian atmosphere were eventually confirmed by Mariner 10. Thus we end up having two longitudinal “systems” for tracking central meridian on Venus: CM I for the surface, and CM II for the upper atmosphere clouds.

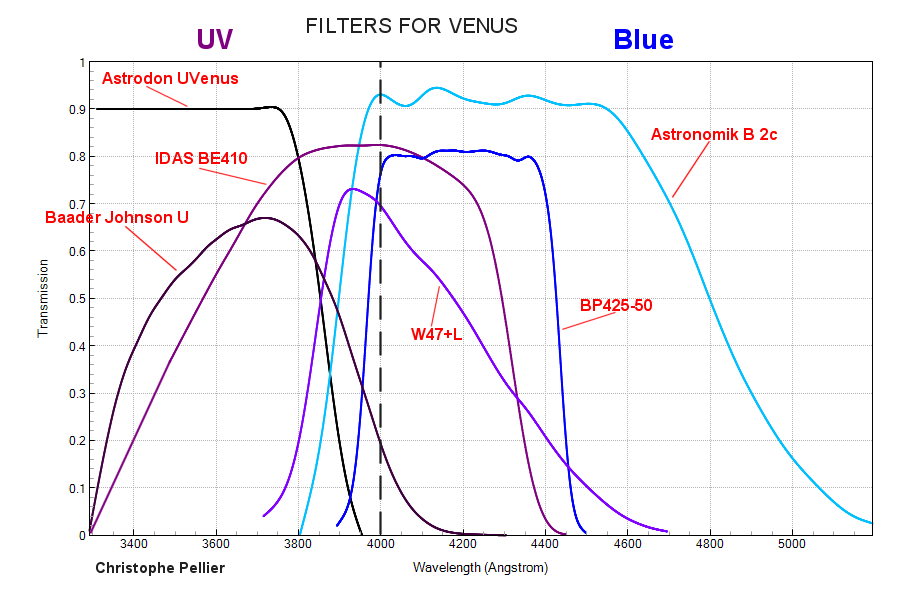
Over the last ten years amateur planetary imagers have gradually been targeting Venus using a UV filter and getting some nice results. UV filters are pricey (north of $200) and sometimes backordered for months. I finally budgeted for the Atrodon UVenus filter which was heralded as having some of the best UV transmission. Renowned imager Damien Peach put together a video on his patreon channel that provided further tips on obtaining a successful UV image such as combining it with an infrared blocking filter since many UV filters leak IR which can smear the image.

Sample transmission for UV filters


With Venus approaching its greatest eastern elongation (distance in our sky) from the Sun, it was time to try again to capture cloud details on our neighboring planet. Starting at sundown I worked on centering the planet with good focus to begin acquiring my UV videos. Reasonably calm seeing is really important for achieving that focus and often not present when dealing with an object like Venus that is never more than about 40° high, but I finally got that on my May 15th session. I confess that I was pretty ecstatic being able to make out what seemed to be a southern cusp cap on the image shown on the laptop during acquisition, implying I would have something worthwhile to work with. And the next day when putting the video through my processing workflow I ended up with a nice result, clearly showing north and south cusp caps with some of the darker collar. The center of the planet shows segments of lighter and darker clouds.

Venus May 15, 2023 in UV


In my researching about capturing Venus in ultraviolet I came across a few sources that argued that introducing any sort of lens element in the imaging train (e.g., a Barlow lens, an SCT corrector plate) was to be avoided if possible since these can cut down on the amount of UV light considerably. The ideal situation is a mirror telescope such as my 10” Newtonian. For the heck of it I did a capture at the end of the session using the Barlow. While the seeing may have deteriorated by that point, my results certainly seemed to confirm that the benefit of a larger image was far offset by the decline in sharpness of the low contrast cloud features.

So, what do the darker regions represent? In classic Venus fashion the planet will not give up that information yet. Some scientists believe that it is a photochemical reaction in the atmosphere that results in UV absorbing material. However, there are even some who argue it could be cloud based microbial life generating these regions and liken it to algae blooms that we see here on Earth. With a bevy of spacecraft heading Venus' way later this decade we may eventually get an answer to this question.

As usual I submitted the final results to ALPO. A few hours later I heard back from Julius Benton, the Venus section coordinator. “Thanks. Your UV image looks very good!” was great feedback to receive, and confirmation that the multi-year journey to acquire the equipment and knowledge on how to make Venus finally give up some details was satisfying indeed.